Despite having an original Game Boy when I was young (which I only remember playing Kirby’s Dream Land on), what I remember the most was my atomic purple Game Boy Color. It was my window into Pokemon and The Legend of Zelda through games like Pokemon Blue and The Legend of Zelda: Link’s Awakening DX. Because of that, it would set the stage for the games I would play for years to come.
The Nintendo Switch today feels like what that Game Boy Color did to me then, and, as a throw back to it, I wanted to replace the gray shells on my Nintendo Switch’s Joy-Cons with atomic purple shells.
Disclaimer
Take apart your Nintendo Switch Joy-Cons at your own risk. I am not, nor is anyone else, responsible for any potential damage caused to your Joy-Cons when you take them apart.
Replacement Joy-Con Shells
There are replacement Joy-Con shells from a lot of third-party vendors. I ended up going with BASSTOP, and I ordered the BASSTOP Atomic Purple Joy-Con Shells. If atomic purple is not your color, there are plenty of other colors available for purchase.
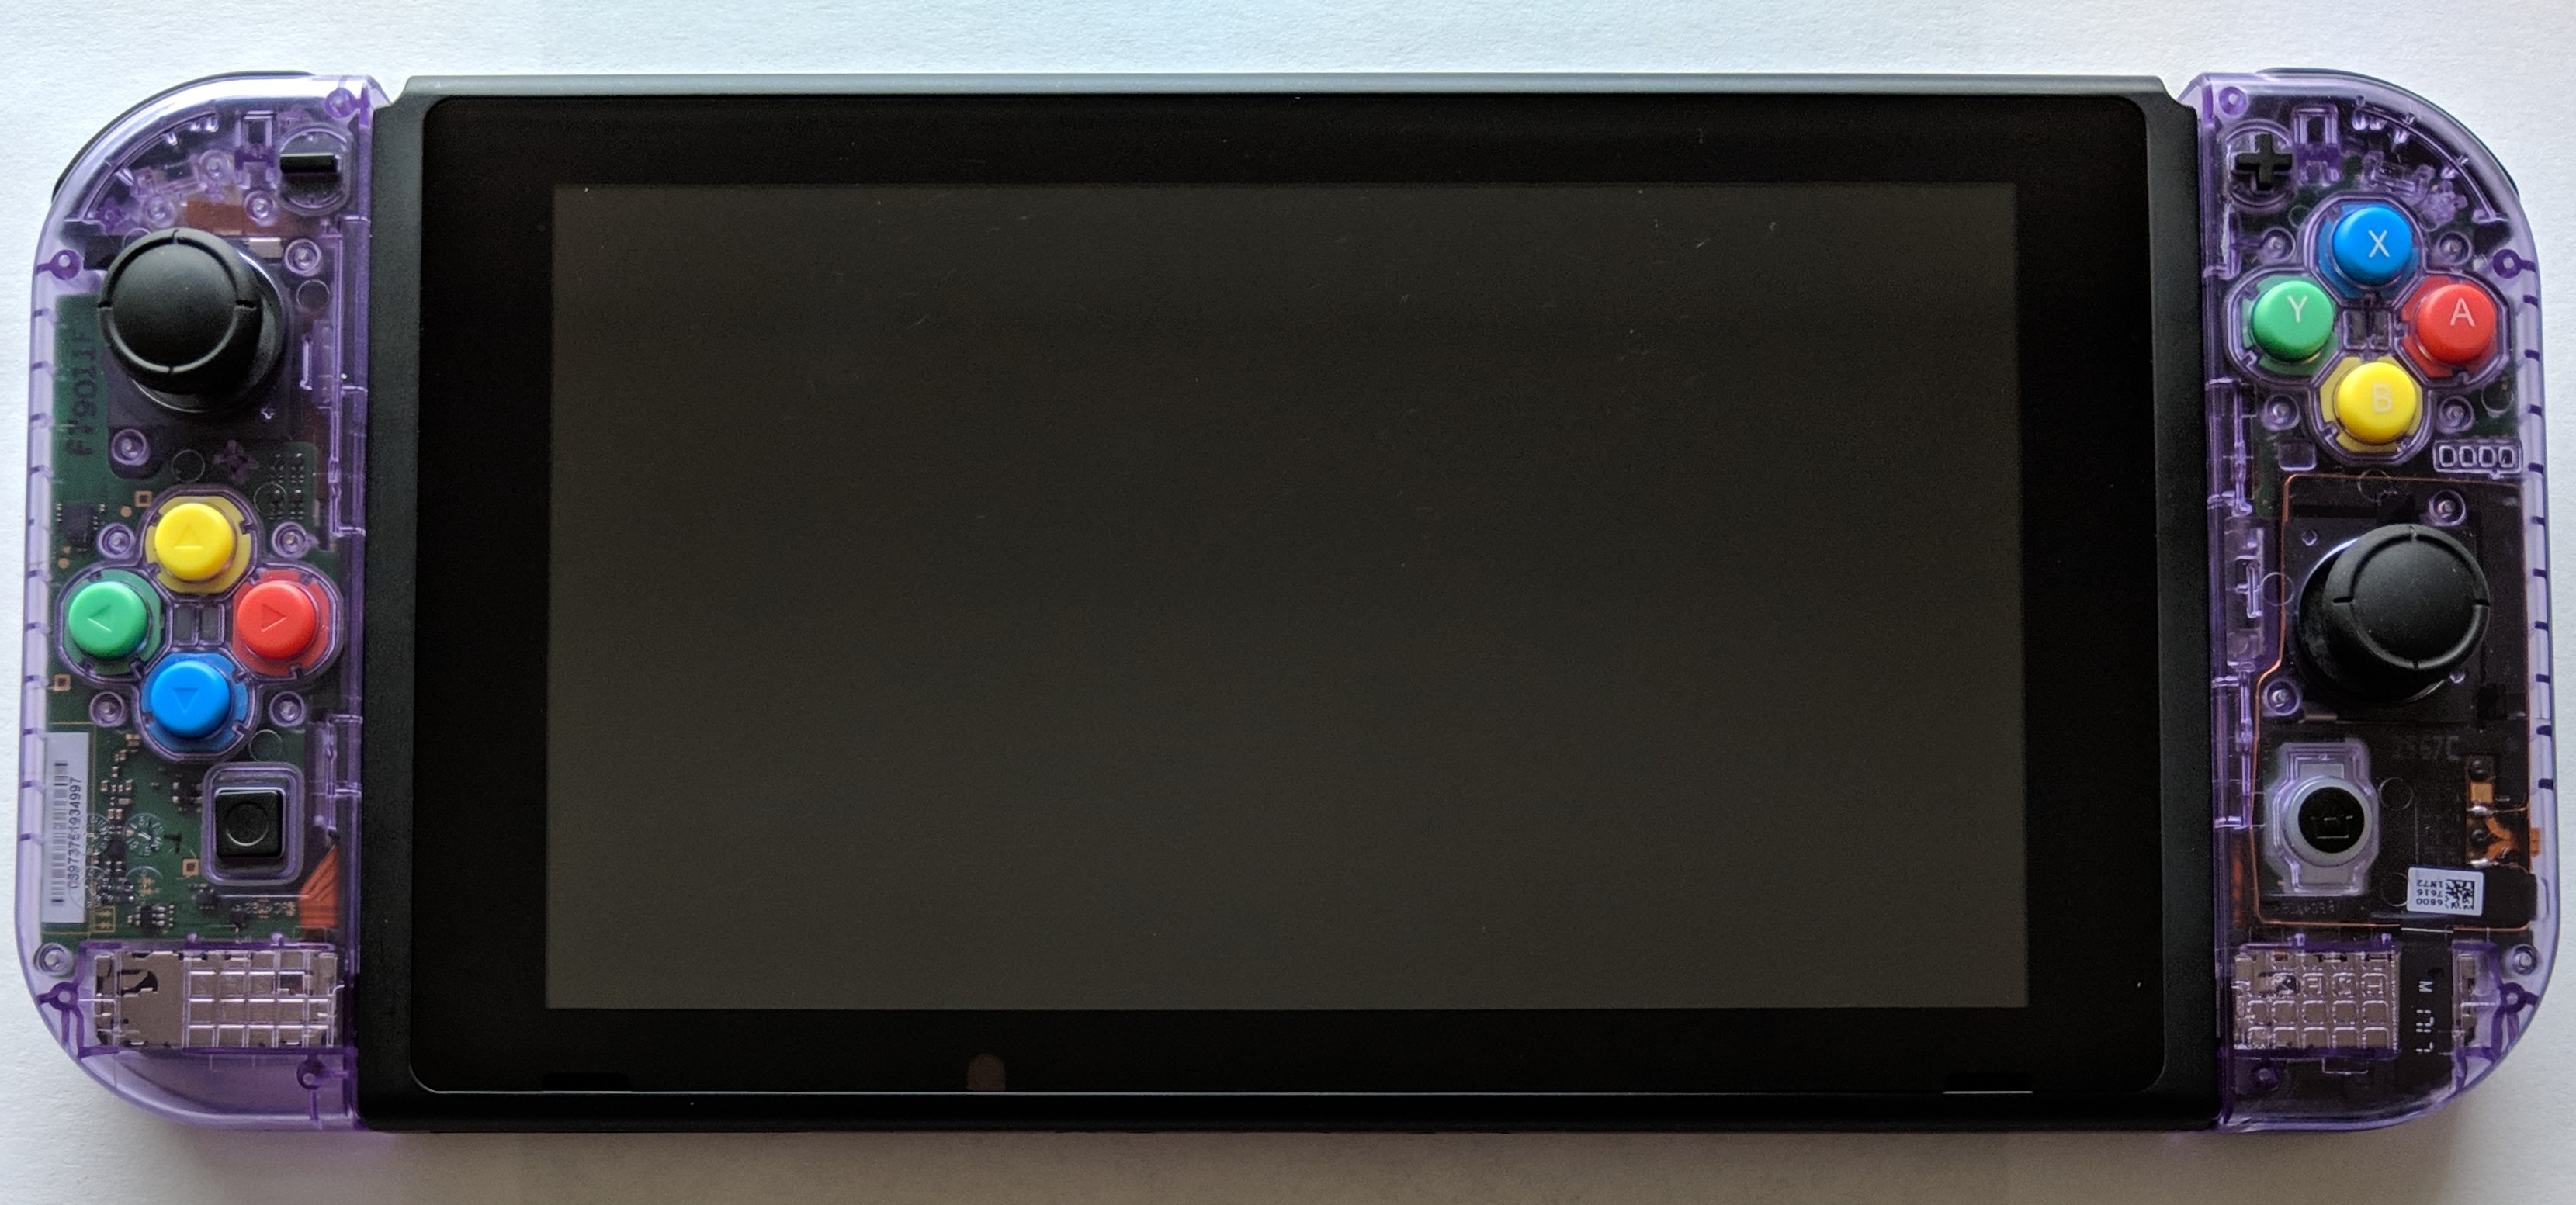
With the replacement Joy-Con shells assembled, the atomic purple color on the replacement Joy-Con shells looks almost identical to the atomic purple Game Boy Color. Obviously, I don’t have an atomic purple Game Boy Color to compare side-by-side, but, if there are any differences, I can’t tell.
It’s difficult to describe the quality of the plastic used in the replacement Joy-Con shells. There is nothing wrong with it and it appears strong enough, but be aware that the finish is different compared to any of the original, factory Joy-Con shells. It definitely has a more slippery feel because it isn’t a matte finish. I can only assume some of this has to do with the transparency of the plastic material.
Tools
The Joy-Cons are not simple to disassemble and reassemble, so having the proper tools is going to make the process a lot easier.
Most important is the driver bit you will need to remove the screws from the original, factory Joy-Con Controllers. The original, factory Joy-Con Controllers I took apart required a Tri-point Y00 driver bit. I did not own this driver bit. A single screw driver with a fixed version of that driver bit costs around $6, so I decided to spend more money on a driver bit set that would last a long time and could be used on future projects.
I purchased the iFixit Mako Driver Kit. I was reluctant to spend $30 just to remove some screws, but, upon receiving the driver kit, I quickly realized this was money well spent. I have never seen such attention to detail in a screw driver kit. The case is made out of very sturdy plastic. The case has magnets at each corner to keep it closed and they allow the top to be securely attached under the case when in-use. The driver and all driver bits are stored securely in place with precision cut foam, and they all appear to be made out of high-quality metal that feels really good in your hand.
The last set of tools I would highly recommend are precision tweezers. I did not have any while I was disassembling and reassembling the Joy-Cons. I was still able to position the very tiny screws, remove some unnecessary tape, and unplug power jumper cables, but the process would have been so much easier with precision tweezers. After I finished the modification, I looked to iFixit again and purchased their iFixit Precision Tweezers.
Read and Watch Before Disassembly
As previously mentioned, disassembling and reassembling the Joy-Cons is not a simple task. This was only my second time disassembling and reassembling electronics that I wanted to continue to use. The first time was taking apart an MSI GS65 Stealth Thin to install a second SSD, and I found taking apart the Joy-Cons more complicated primarily because of their small size.
Unless you have prior experience disassembling and reassembling electronics, before you even think about disassembling the Joy-Cons, I would highly recommend you read and watch the following resources a few times to get yourself familiar with the process and gotchas:
- Post: As a total beginner, I was able to replace my Joy Con shells with the Atomic Purple D-Pad set. They turned out beautifully. Here are the guides, materials and advice I used to make the process successful as a beginner
- Post: Removing / Replacing Joy-Con Trigger?
- Video: Nintendo Switch CLEAR EDITION! - DIY Transparent Switch
The Joy-Con part of the video was something I watched while disassembling and then watched in reverse while reassembling. There should be plenty of other Joy-Con disassembly and reassembly videos out there if this one does not provide the level of detail you are looking for, but I found that video to be good enough for my first time taking apart the Joy-Cons.
Issues and Callouts
Issues
I encountered two issues during disassembly and reassembly.
The first issue involved removing the ZL and ZR buttons, which I found to be the most difficult part in the entire process. Those buttons are attached to each Joy-Con by plastic that snaps into place, and, if you are not careful, that plastic can snap off. I had a small piece of plastic snap off while trying to re-attach the ZL button to the left replacement Joy-Con shell. It was impossible to see where that piece of plastic came from, so I simply ignored what happened and moved on. After reassembly, the ZL button on the left Joy-Con appears to function just fine.
The second issue involved the right replacement Joy-Con shell not closing properly because of extra plastic on the inside of the shell. The comments in this reddit post provide more detail (with pictures) of the issue. This issue looks to affect particular colored shells from BASSTOP. I was not able to entirely fix the issue, but I was able to lessen it by using an X-ACTO knife to shave away some of the extra plastic. However, due to carelessness, I did end up scratching part of the plastic that is visible from the outside. In the picture below, you can see the vertical scratch on the right Joy-Con to the upper-left of the Y button.
Callouts
During reassembly, when you are putting the outer shell screws back, do not tighten them completely, especially the top screws near the ZL and ZR buttons. If you do, you might find that the minus and plus buttons do not work. This does not mean you did something wrong, it simply means you need to loosen the screws. Most of the buttons have a rubber gasket and dome behind them so they can function as buttons. This won’t function properly if the outer shell screws are too tight. This is called out briefly in the aforementioned video, but it can be easy to miss.
Final Result
And the final result:
For being my first Nintendo Switch modification, I am very happy with the result. When docked, the atomic purple Joy-Cons are clearly visible, and it makes the Nintendo Switch look that much more interesting.
And, if you take your Nintendo Switch out in public, the atomic purple Joy-Cons will definitely be conversation starters since the only way to get them is to do the modification yourself.