It can be difficult to develop a PXE boot process if you don’t have actual servers to PXE boot. Most of us don’t have a lot of bare metal servers sitting around to use for PXE booting. Luckily, VMware Fusion provides the necessary features to PXE boot virtual machines.
The following steps apply to VMware Fusion 5 and Ubuntu Server 12.04 LTS. Adapting the steps below to different Linux distributions is out of the scope of this post, but it is possible.
From OS X, Create a New PXE Server Virtual Machine and Set Static IP Address
Download the latest Ubuntu Server 12.04 LTS ISO. I will be using ubuntu-12.04.3-server-amd64.iso throughout this post.
Once the ISO is downloaded, create a new virtual machine in VMware Fusion and call it pxe.
Once the virtual machine has finished installing and it has booted, open the virtual machine’s console in VMware Fusion, login and change eth0’s IP address from DHCP to a static IP address outside of the DHCP scope.
Before this can happen though, you need to figure out what DHCP range VMware Fusion is currently using. Open the Terminal application on OS X and run the following command:
grep range /Library/Preferences/VMware\ Fusion/vmnet8/dhcpd.conf
One line should be returned in the format range $STARTING_IP_ADDRESS $ENDING_IP_ADDRESS;.
For example, my output was range 172.16.247.128 172.16.247.254;. This is the range VMware Fusions’s DHCP server will pull IP addresses from to assign to new virtual machines. You do not want the PXE server to ever change its IP address, so change its IP address to something outside of the above range.
In my case, I picked an IP address between 172.16.247.3 and 172.16.247.127. 172.16.247.1 is in use by OS X and 172.16.247.2 is also in use as you will see later in the dhcpd.conf file.
Once you have picked an IP address, I picked 172.16.247.100, go back to the virtual machine’s console in VMware Fusion, login, and change eth0’s IP address from DHCP to a static IP address by doing the following:
sudo vim /etc/network/interfaces
Change everything under # The primary network interface to the following (your address and gateway may be different):
auth eth0
iface eth0 inet static
    address 172.16.247.100
    netmask 255.255.255.0
    gateway 172.16.247.2
Save, quit, and restart networking:
sudo /etc/init.d/networking restart
Your virtual machine should now have a new IP address. Use ping to verify the virtual machine can talk to itself, its gateway, and the internet.
From OS X, Configure VMware Fusion’s DHCP Server to PXE Boot
Open the Terminal application on OS X and run the following command to stop all of VMware Fusions’s networking services (DHCP, NAT, etc) on vmnet1 and vmnet8 (your vmnet interfaces could be numbered differently):
sudo /Applications/VMware\ Fusion.app/Contents/Library/vmnet-cli --configure
Now, open /Library/Preferences/VMware\ Fusion/vmnet8/dhcpd.conf with your favorite text editor.
In the subnet {} section of the dhcpd.conf file the following two lines will be added:
next-server $IP_OF_PXE_SERVER;
filename "pxelinux.0";
Replace $IP_OF_PXE_SERVER with the static IP address you set earlier. In my case it was 172.16.247.100.
The dhcpd.conf file should now look like the following (your IP address ranges may be be different):
allow unknown-clients;
default-lease-time 1800;                # default is 30 minutes
max-lease-time 7200;                    # default is 2 hours

subnet 172.16.247.0 netmask 255.255.255.0 {
    range 172.16.247.128 172.16.247.254;
    option broadcast-address 172.16.247.255;
    option domain-name-servers 172.16.247.2;
    option domain-name localdomain;
    default-lease-time 1800;                # default is 30 minutes
    max-lease-time 7200;                    # default is 2 hours
    option netbios-name-servers 172.16.247.2;
    option routers 172.16.247.2;
    next-server 172.16.247.100;
    filename "pxelinux.0";
}
host vmnet8 {
    hardware ethernet 00:50:56:C0:00:08;
    fixed-address 172.16.247.1;
    option domain-name-servers 0.0.0.0;
    option domain-name "";
    option routers 0.0.0.0;
}
Lastly, start up all of VMware Fusions’s network services with the following command:
sudo /Applications/VMware\ Fusion.app/Contents/Library/vmnet-cli --start
Configure PXE Server Virtual Machine
Log in to your new PXE server virtual machine.
Install the apache2 package:
sudo apt-get install apache2
Install the tftpd-hpa package:
sudo apt-get install inetutils-inetd tftpd-hpa
Copy the Ubuntu Server 12.04 LTS ISO you downloaded earlier on OS X to your PXE server virtual machine using scp, rsync, or some other method.
Mount the Ubuntu Server 12.04 LTS ISO:
sudo mount -o loop ubuntu-12.04.3-server-amd64.iso /mnt
Copy the necessary tftp boot files:
sudo cp -r /mnt/install/netboot/* /var/lib/tftpboot/
Create a folder in the public web directory for the Ubuntu Server 12.04 LTS ISO contents:
sudo mkdir -p /var/www/ubuntu-12.04.3-server-amd64
Copy the Ubuntu Server 12.04 LTS ISO contents to the public web directory:
sudo cp -r /mnt/* /var/www/ubuntu-12.04.3-server-amd64/
Unmount the Ubuntu Server 12.04 LTS ISO:
sudo umount /mnt
During installation, the installer always throws the following Debootstrap warning:
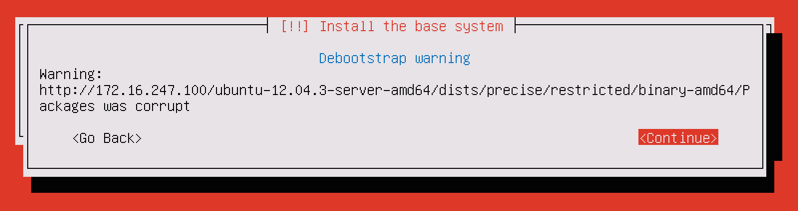
The installer is still running when this appears. To fix it, create a Packages file:
sudo touch /var/www/ubuntu-12.04.3-server-amd64/dists/precise/restricted/binary-amd64/Packages
Create the Kickstart Profile in the public web directory:
sudo vim /var/www/ks.cfg
Put the following contents in /var/www/ks.cfg and be sure to change $PASSWORD, $IP_OF_PXE_SERVER, $USERNAME, and Full Name Here to values that match your environment:
install
text

url --url http://$IP_OF_PXE_SERVER/ubuntu-12.04.3-server-amd64

lang en_US.UTF-8
keyboard us

network --device eth0 --bootproto dhcp

timezone --utc UTC

zerombr
clearpart --all --initlabel
bootloader --location=mbr

part /boot --fstype=ext3 --size=256 --asprimary
part pv.01 --size=1024 --grow --asprimary
volgroup vg_root pv.01
logvol swap --fstype swap --name=lv_swap --vgname=vg_root --size=1024
logvol / --fstype=ext4 --name=lv_root --vgname=vg_root --size=1024 --grow

auth --enableshadow --enablemd5

# $PASSWORD will be in plain text. Should use --iscrypted with a hashed password
rootpw --iscrypted $PASSWORD
# $PASSWORD will be in plain text. Should use --iscrypted with a hashed password
user $USERNAME --fullname "Full Name Here" --password $PASSWORD

firewall --disabled

skipx

reboot

%packages
ubuntu-minimal
openssh-server
openssh-client
wget
curl
git
man
vim
ntp

%post

# Uncomment to add user to sudoers
#usermod -aG sudo $USERNAME

# The url parameter above overwrites the default apt source list, this puts it back
(
cat <<'EOP'
deb http://us.archive.ubuntu.com/ubuntu/ precise main restricted universe
deb http://us.archive.ubuntu.com/ubuntu/ precise-security main restricted universe
deb http://us.archive.ubuntu.com/ubuntu/ precise-updates main restricted universe
EOP
) > /etc/apt/sources.list
apt-get update
Finally, start the apache2 and tftpd-hpa services:
sudo service apache2 start

sudo service tftpd-hpa start
From OS X, To Kickstart New Ubuntu Virtual Machines…
Go to VMware Fusion > File > New…
Click Continue without disc
Choose Create a custom virtual machine
Configure the new virtual machine to your liking.
Start up the virtual machine and let it PXE boot.
You should be presented with the Ubuntu logo with options to Install, Command-line install, etc.
Use the up and down arrows to highlight Install, hit Tab, and the boot options should appear.
Append the following to the boot options and be sure to change $IP_OF_PXE_SERVER and $HOSTNAME (can be short name or FQDN) to values that match your environment:
ks=http://$IP_OF_PXE_SERVER/ks.cfg hostname=$HOSTNAME
Hit Enter to begin the Kickstart process.
If everything worked, you should have a newly kickstarted Ubuntu Server 12.04 LTS virtual machine ready to go in 5 to 10 minutes.